
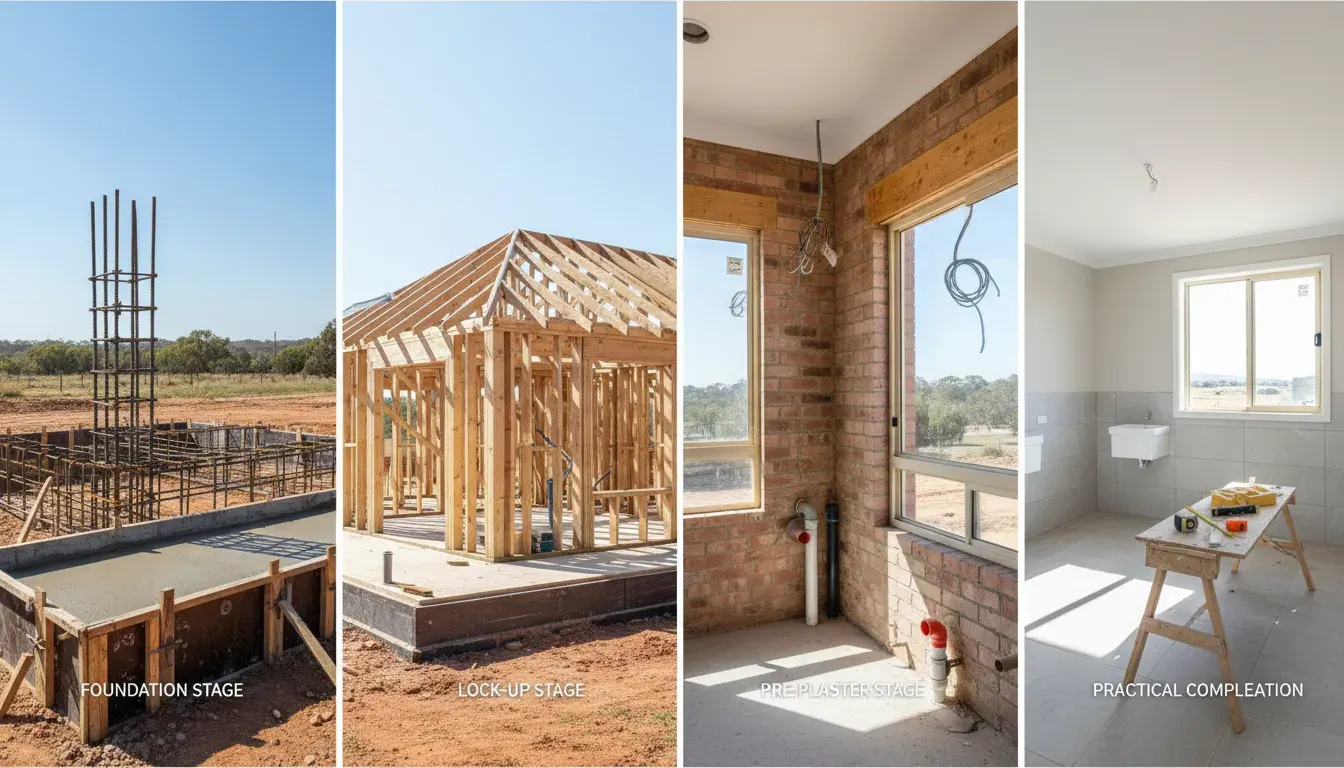
At each construction stage the defects that matter most are the ones about to be covered up. At slab stage that means reinforcement placement, the vapour barrier and the termite management system, all of which disappear under concrete. At frame stage it is tie-downs, bracing and timber grades, which disappear under cladding and plasterboard. At lock-up it is roof flashings and window head flashings, at waterproofing stage it is the membrane and water stops, and at practical completion it is finishes, function and the certificates you are owed.
That sequencing is the whole point. Rectifying a missing tie-down bracket before the plasterboard goes on is a tradesman with a nail gun. Rectifying it afterwards means opening walls. This guide covers what to look for at each stage, which inspections your certifier is legally required to do in NSW, Victoria and Queensland, what tolerance actually counts as a defect, and how long you have to claim once you have the keys.
53%
NSW apartment buildings registered 2016 to 2022 with a serious defect
7
Mandatory critical stage inspections for a house in NSW
5
Independent stage inspections we recommend
Understanding Construction Stages in Australia
Australian residential construction follows a predictable sequence of stages, and each one triggers a progress payment under your building contract. The stage boundary is what gives you leverage, because you are being asked to approve work at exactly the moment it is still visible. Knowing which stage is coming tells you when to book new construction stage inspections and what to prioritise once you are on site.
| Stage | Payment (typical) | Key Focus Areas | What Gets Hidden Next |
|---|---|---|---|
| Base/Slab | 15-20% | Foundations, moisture barriers, concrete, termite system | Everything below the slab surface |
| Frame | 20-25% | Structural timber, bracing, tie-downs, truss installation | All framing, once clad and lined |
| Lock-Up | 20-25% | Roof, windows, external cladding, flashings | Flashings behind cladding and linings |
| Fixing/Fit-Off | 15-20% | Internal linings, wet area membranes, services | Waterproofing, once tiled |
| Practical Completion | 5-10% | Finishes, functionality, compliance, certificates | Nothing, but your leverage ends here |
Critical Timing
Book your independent inspection before signing off on each stage payment. Once you pay, you have released the single strongest incentive the builder has to come back and fix something.
The payment percentages above are typical of volume builder contracts and are not fixed by law. Your contract governs. Read the payment schedule before the slab is poured, not after, because the stage names in the contract will not always match the stage names your builder's site supervisor uses on the phone.
Which Stage Inspections Are Mandatory in NSW, Victoria and Queensland?
Every state requires a building certifier or surveyor to inspect at set points, but the number of points and what they cover differ substantially. NSW mandates seven critical stage inspections for a new house, Victoria works from mandatory notification stages listed in the building permit, and Queensland requires inspections at excavation, footings, slab, frame and final. None of these are quality inspections, and that distinction is the reason independent stage inspections exist.
| State | Regulator | Mandatory inspection points for a new house | What they check |
|---|---|---|---|
| NSW | Building Commission NSW, via your Principal Certifier | Commencement, after excavation and before footings, before pouring in-situ reinforced concrete, before covering framework, before covering wet area waterproofing, before covering stormwater drainage, and final before the occupation certificate | Compliance with the development consent and the NCC |
| VIC | Building and plumbing regulator, via your Relevant Building Surveyor | The mandatory notification stages listed in the building permit, typically before placing footings, before pouring an in-situ reinforced concrete member, on completion of framework, and on completion of the building | Compliance with the Building Act 1993, the Building Regulations 2018 and the permit |
| QLD | QBCC, via your building certifier | Excavation, footings, slab, frame, and final | Compliance with the Building Act 1975 and the approved documents |
Two things follow from that table. First, NSW is the only one of the three that mandates a separate inspection of wet area waterproofing before it is covered, which is why waterproofing defects are so heavily represented in Victorian and Queensland disputes. Second, all three regimes are compliance checks against approved plans and the code, carried out in a visit that is frequently under thirty minutes. A certifier who signs off a frame has confirmed it is not unlawful. They have not confirmed it is straight, or that the studs your plasterboard is about to be fixed to are not bowed.
Certifier is not the same as inspector
A certifier works for compliance. An independent inspector works for you. The two overlap at maybe a third of what matters, and the gap is exactly where workmanship defects live: items that meet minimum code but fall below the standard your contract promised.
Slab Stage Critical Defects
Slab stage is really two inspection opportunities, and most owners only take the second one. The valuable inspection is pre-pour, while the formwork, reinforcement, vapour barrier and termite system are all still visible. Once the concrete truck leaves, every one of those items is permanently unverifiable, and the post-pour inspection can only assess the finished surface.
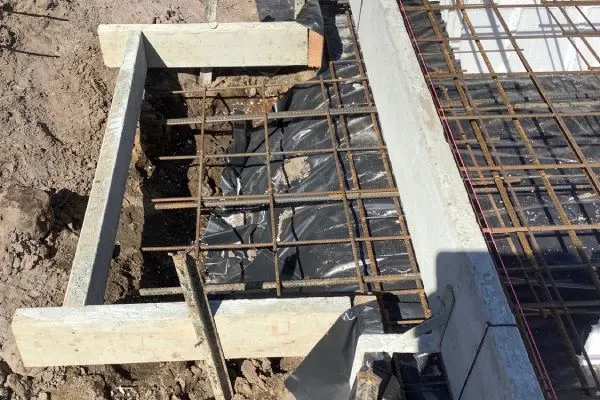
The photograph above is a pre-pour inspection. Everything visible in it, the trench mesh, the bar chairs holding the reinforcement off the ground, the black vapour barrier and its lap joints, becomes invisible the moment the pour starts. This is the only day it can be checked.
Pre-pour: what to verify before the concrete arrives
Post-pour: what the finished slab tells you
- Honeycombing, which is air pockets left where concrete did not consolidate
- Exposed reinforcement, indicating inadequate cover
- Cracking beyond shrinkage, particularly cracks over 0.3mm wide
- Slab level outside the tolerance your floor covering requires
- Damaged or breached termite barrier at the perimeter
Cracks are the item owners worry about most and the one most often misread. Fine surface crazing in a new slab is normal shrinkage. A crack that is wide, that steps, or that runs through the full slab depth is a structural question and needs an engineer, not an opinion. Slab classification under AS 2870 (Residential slabs and footings) governs what the slab was designed to tolerate on your particular soil, so the engineer's design, not a rule of thumb, is the reference point.
Hidden Danger
Termite management systems installed at slab stage are frequently damaged during construction by later trades cutting or drilling through them. If a barrier is breached and not repaired, and the repair is not documented, your termite warranty may be worthless when you need it.
Frame Stage Structural Concerns
Frame stage is the most consequential inspection point of the build. The structural frame carries the roof and resists wind load, and within a few weeks of the frame going up it will be sheeted outside and lined inside, at which point assessing it means removing finished work. A frame defect found on the day costs an hour of a carpenter's time. The same defect found after handover is a demolition job.
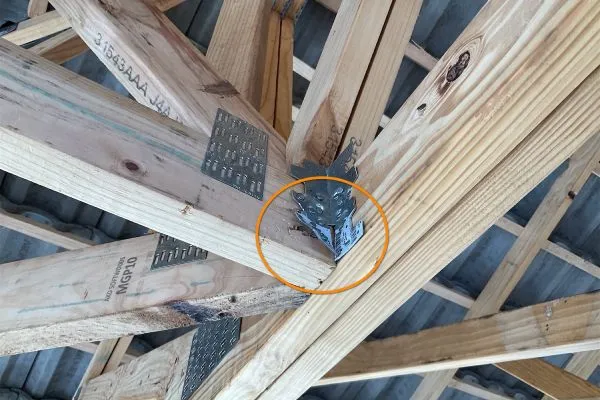
The circled connection above is a truss tie-down bracket that has not been fixed as designed. Nothing about the finished house would reveal it. It becomes a problem in the first serious wind event, years after everyone involved has moved on.
Critical frame defects
| Defect Type | Severity | Rectification Difficulty |
|---|---|---|
| Missing or incorrectly fixed tie-down connections | Major | Moderate before lining |
| Out-of-plumb walls (>5mm/2.4m) | Major | Difficult after lining |
| Undersized or incorrect timber grades | Major | Very difficult |
| Inadequate or missing bracing | Major | Moderate before lining |
| Incorrect truss installation or unauthorised truss cutting | Major | Expensive |
| Missing noggins at plasterboard sheet joins | Minor | Easy before lining |
| Excessive notching or drilling of studs by services trades | Major | Moderate before lining |
- Twisted or bowed studs that will telegraph through finished wall linings
- Incorrect spacing of structural members against the frame layout
- Missing or inadequate fire separation framing at boundary walls
- Unapproved modifications to engineered designs, including cut trusses
- Sarking torn, missing, or with inadequate lap at the roof
Frame inspections verify compliance with AS 1684 (Residential timber-framed construction) and with the engineer's specific design where one applies. Connection details matter as much as member sizes: nail patterns, connector plate types and the number of fixings per plate are specified, not discretionary. Plumbers and electricians are the other common source of frame defects, because a stud notched too deeply for a waste pipe is a structural member that no longer does its job, and that work happens after the certifier's frame inspection.
Lock-Up Stage Weatherproofing Issues
Lock-up means the building is enclosed: roof on, external cladding fixed, windows and external doors installed. From this point the dominant risk changes from structure to water. Every weatherproofing defect at lock-up shares one characteristic, which is that it does not leak on the day. It leaks in the third year, into a wall cavity you cannot see, and by the time a stain appears on a ceiling the framing behind it has been wet for a long time.
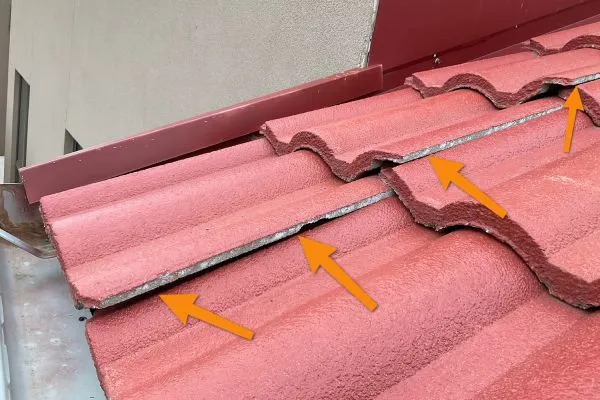
The arrows above mark a roof to wall junction where the flashing and tile relationship is wrong. Water running down that wall in a driving rain has a path into the roof space. It is visible from a ladder at lock-up and invisible from the ground forever after.
Weatherproofing checklist
Roof Assessment
Check tile or sheet fixing, flashings at every penetration, valley and ridge cappings, sarking laps and support, and gutter fall towards downpipes.
Window and Door Installation
Verify head flashings above every opening, sill drainage and weep holes, weatherstripping, and sealant that is continuous rather than intermittent.
External Cladding
Inspect joints and control joints, clearances to finished ground and to paving, cavity drainage, and terminations at corners and penetrations.
Site Drainage
Confirm agricultural drains, surface falls away from the building, and stormwater connections, because water sitting against a slab edge undermines the termite barrier and the footing.
Missing window head flashings are the single most common lock-up defect we document. The flashing is a strip of material costing a few dollars, installed in a minute, and completely hidden once the cladding and internal lining go on. Its absence sends water that hits the window head straight into the wall frame instead of back out to the face of the cladding.
If you find weatherproofing defects and the builder disputes them, a defect investigation report documents the issue with the photographic evidence and standards references a tribunal will expect.
Fixing and Waterproofing Stage Defects
The fixing stage covers internal linings, wet area waterproofing, tiling, joinery and services fit-off, and it contains the most expensive hidden defect in Australian residential construction: a failed shower membrane. Waterproofing is applied, inspected, then tiled over, and the tiling is the point of no return. Rectifying a failed shower after handover means removing tiles, screed and membrane, and reinstating the room.
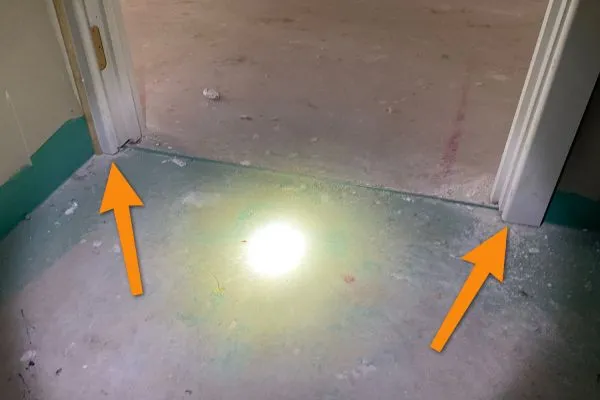
The green membrane in the photograph is the waterproofing, and the arrows mark the door opening. This junction is where a water stop angle belongs, set so its vertical leg finishes flush with the finished floor level. Without it, water that reaches the doorway leaves the wet area under the tiles.
Waterproofing is governed by AS 3740 (Waterproofing of domestic wet areas) and NCC Volume Two. The key requirements to check before tiling begins:
- The entire shower enclosure wall lining waterproofed to at least 1800mm above the finished floor level, or 50mm above the shower rose, whichever is higher
- Wall and floor junctions, internal and external corners and horizontal joints treated with a bond breaker and reinforcing over a minimum 40mm width either side of the junction
- Walls waterproofed to at least 150mm above the shower floor substrate, with the remainder water resistant
- A water stop at every wet area door opening, with the vertical leg flush to the finished floor
- All penetrations, being wastes, taps and shower outlets, individually sealed
- Falls to the floor waste, checked with water before tiling rather than assumed
- A waterproofing certificate issued by the licensed applicator, naming the product and the areas treated
Other fixing stage items worth catching: plasterboard fixed to bowed studs, cornice and skirting gaps, doors that do not latch because frames are out of square, and services fit-off that has cut through fire collars or insulation. None of these are hidden the way waterproofing is, but they multiply into a very long practical completion list if nobody raises them at fixing stage.
Book the Inspection Before the Tiles Go On
Waterproofing is the one defect you cannot see, cannot test after the fact, and cannot fix cheaply. An independent inspection at fixing stage checks it while it is still visible.
Practical Completion Final Defects
Practical completion, also called pre-handover, is the point at which the dwelling is substantially complete and fit for occupation. It is also the last moment you hold money. Defects at this stage are mostly cosmetic and functional rather than structural, but the list is long: a thorough pre-handover inspection on a new volume-built home routinely runs to 60 or more items.
- Practical Completion
The point at which construction is substantially complete and the dwelling is fit for occupation, though minor defects may remain outstanding.
- Defects Liability Period
A contractual period, typically 13 weeks to 6 months, during which the builder must return and rectify defects identified after handover at no cost.
Common pre-handover defects
| Category | Examples | Typical Count per Home |
|---|---|---|
| Paint finishes | Runs, missed areas, poor cut-in, roller marks | 15-30 items |
| Joinery | Gaps, poor alignment, scratches, doors not closing flush | 10-20 items |
| Wet areas | Grout voids, silicone quality, falls to waste, missing certificate | 5-15 items |
| Flooring | Tile lippage, drummy tiles, carpet stretching, timber gaps | 5-10 items |
| Functionality | Doors, windows, locks, exhaust fans, smoke alarms | 5-15 items |
| Documentation | Missing waterproofing, termite, glazing or energy certificates | 3-8 items |
The documentation row is the one owners skip and later regret. A waterproofing certificate, a termite treatment certificate and the engineer's certificates are not paperwork, they are the evidence you will need for a warranty claim, an insurance claim or a sale. Ask for them at practical completion while you still have a final payment to release.
Booking a pre-handover inspection gives you that list in a form the builder cannot argue with: photographed, located room by room, and referenced to a standard.
What Tolerance Actually Counts as a Defect?
Most stage disputes are not about whether something is out, they are about whether it is out far enough to matter. In Victoria the reference is the Guide to Standards and Tolerances, which sets numerical benchmarks for workmanship in areas the legislation and the contract leave open, and it is widely used as persuasive guidance elsewhere. Knowing the number turns "it looks wrong to me" into a claim.
| Element | Benchmark | Period it applies |
|---|---|---|
| Floor level, within a room or area | Should not differ by more than 10mm | Within 24 months of handover |
| Floor level, over any 2m length | Should not differ by more than 4mm | Within 24 months of handover |
| Floor level, across the whole building footprint | Should not exceed 20mm deviation | Within 24 months of handover |
| Wall plumb | Commonly assessed at 5mm over a 2.4m height | Frame and lining stages |
| Shower waterproofing height | Minimum 1800mm above finished floor, or 50mm above the shower rose | AS 3740, at fixing stage |
Measure before you argue
Photograph the measurement, not just the defect. A photograph of a spirit level or a straightedge against the wall, with the gap visible, is evidence. A photograph of a wall that looks bent is an opinion.
Tolerances cut both ways, and an honest inspector will tell you when an item you have flagged is within tolerance. That is worth more than a longer list, because a defect register padded with items that are compliant is easy for a builder to dismiss wholesale, taking the genuine items with it.
Ensuring Defects Are Fixed Before Progression
Whether defects were actually fixed before the build progressed is the question that decides how much your house is worth in ten years. The mechanism is your building contract, which almost always requires you to approve a stage before the builder proceeds and before you release payment. That approval is the leverage, and it exists once per stage.
Pros
- Written defect lists create accountability and a dated record
- Photographic evidence supports future warranty and tribunal claims
- Stage payments provide rectification leverage while work is visible
- Independent inspections give an objective assessment against a standard
- Re-inspection after rectification proves the fix, not just the promise
Cons
- Verbal agreements on site are difficult to enforce later
- Signing off without inspection releases your only leverage
- Relying solely on certifier inspections misses workmanship defects
- Delaying a complaint until handover means arguing about concealed work
Documentation Practice
Keep a single defect register with photographs, dates, the standard or clause relied on, and the builder's written response to each item. Send it by email rather than raising items in site conversations. If the matter ever reaches a tribunal, the register is the document that does the work.
The practical sequence is: inspect, issue the report, send the defect list in writing, get a written response, have the rectification re-inspected, then approve the stage. Skipping the re-inspection is the common failure. "It has been fixed" and "it has been fixed correctly" are different claims, and only one of them can be verified.
How Long Do You Have to Claim a Defect After Handover?
Time limits differ by state and are shorter than most owners assume. In NSW the statutory warranty runs 6 years for a major defect and 2 years for anything else. In Victoria a building action generally cannot be brought more than 10 years after the occupancy permit or certificate of final inspection is issued. In Queensland the QBCC home warranty scheme covers structural defects for 6 years and 6 months from the contract date, and non-structural defects for a much shorter window.
| State | Structural or major defects | Non-structural defects | Runs from |
|---|---|---|---|
| NSW | 6 years | 2 years | Completion of the work |
| VIC | 10 year limitation on building actions | Same 10 year limitation applies to the action | Issue of the occupancy permit or certificate of final inspection |
| QLD | 6 years and 6 months under the QBCC scheme | Substantially shorter, check the current QBCC policy conditions | Date of the contract |
The clock is not the only constraint
Even inside the limitation period, a defect you cannot prove existed at handover is hard to run. The value of a stage inspection report is that it dates the condition of the work. Five years on, a photograph taken at frame stage settles an argument that a photograph taken today cannot.
Owner Inspections is an inspection company, not a law firm. We can establish what the defect is, what standard it breaches and what it will cost to rectify. Whether a claim is available to you, and against whom, is a question for a solicitor or your state tribunal, being NCAT in NSW, VCAT in Victoria and QCAT in Queensland.
Frequently Asked Questions
What are the stages of construction in Australia?
A typical Australian house build runs base or slab, frame, lock-up, fixing or fit-off, and practical completion. Each stage triggers a progress payment under the building contract.
Some contracts split these further, adding a separate base stage before the slab, or separating fixing from fit-off. Multi-storey and custom builds add stages. The names in your contract are the ones that govern payment, so read the payment schedule rather than relying on generic stage names.
How many stage inspections should I get during construction?
Five is the standard recommendation: pre-slab or pre-pour, frame, lock-up, fixing including waterproofing, and practical completion. Complex or multi-storey builds justify more.
Some owners add a re-inspection after rectification at the frame and waterproofing stages, which is where we see the most repeat defects. Each inspection generally costs between $300 and $500 depending on stage, location and property size.
What happens if defects are not fixed before the next stage?
They become concealed, which multiplies rectification cost and can void warranties where the defect was covered up rather than repaired. You also lose the payment leverage tied to that stage.
Your contract typically requires you to approve each stage before the builder proceeds. If you sign off knowing defects exist, you may be treated as having accepted them. Document every defect in writing and withhold stage approval until critical items are rectified and re-inspected.
Are frame stage defects the most important to catch?
Frame defects are the most consequential because framing becomes permanently concealed and carries the structural load. Pre-pour slab defects run a close second for the same reason.
Incorrect tie-downs, undersized timbers or inadequate bracing affect the structural integrity of the whole building, and rectification after lining requires demolition. Waterproofing is the third: not structural, but the most expensive non-structural defect to fix after the fact.
Can I withhold payment if defects are not fixed?
Generally you can withhold an amount proportionate to the value of the defective or incomplete work, but withholding an entire stage payment over minor defects risks putting you in breach.
Document the defects thoroughly and communicate in writing. What is proportionate depends on your contract and the specific work. This is the point at which you should get legal advice rather than act on a general rule, because the consequences of getting it wrong fall on you.
How level does a slab have to be?
Under the Guide to Standards and Tolerances, a floor should not differ in level by more than 10mm in any room, or 4mm over any 2m length, within 24 months of handover.
The overall deviation across the whole building footprint should not exceed 20mm in the same period. Slabs outside these figures need grinding or levelling compound before floor coverings go down, which is a cost and a delay somebody has to wear.
Should the building certifier catch all defects?
No. Certifiers verify compliance with the approved plans and the code at set inspection points. They are not engaged to assess workmanship quality and typically spend limited time on site.
An item can be fully code compliant and still be poor work, or still breach what your contract promised. Independent inspections complement certifier reviews by assessing quality and contractual compliance, which is where most owner disputes actually sit.
How long do I have to report defects after handover?
The contractual defects liability period is usually 13 weeks to 6 months, but statutory time limits run much longer: 6 years for major defects in NSW, and a 10 year limitation on building actions in Victoria.
Queensland works differently again, with QBCC scheme cover of 6 years and 6 months for structural defects from the contract date. Report defects in writing as soon as you find them regardless of which period applies, because delay weakens the claim even when time has not expired.
What defects are most commonly missed without an independent inspection?
Frame tie-down connections, wet area membrane installation, window head flashings and termite barrier continuity. All four are concealed by the next stage and none of them fail immediately.
Others we document regularly include inadequate roof sarking laps, missing fire collars around service penetrations, and studs over-notched by plumbers after the certifier's frame inspection has already happened.
Can I attend stage inspections myself?
Yes, and attending alongside your inspector is the best version. You see the issues firsthand and can ask questions, while the technical assessment is still done by someone trained to make it.
Identifying structural defects, code compliance issues and workmanship problems requires training and experience, and much of what matters is only recognisable if you know what the design required. Site access and safety rules apply, so arrange attendance with the builder in advance.
What documentation should I receive at each stage?
Engineer's certificates, waterproofing certificates, termite treatment certificates, glazing and energy compliance certificates, and your certifier's inspection records at the relevant stages.
Keep every certificate, inspection report, approved plan, variation and item of written correspondence. These are what a future insurance claim, warranty dispute or sale will demand, and several are required before a final occupancy certificate can be issued at all.
Key Takeaways
- Each construction stage conceals the one before it, so the defects that matter are the ones about to become invisible
- Pre-pour is the valuable slab inspection: reinforcement, vapour barrier and termite system cannot be verified once the concrete is placed
- Frame stage is the most consequential point in the build, covering tie-downs, bracing, timber grades and services damage to studs
- Lock-up defects, especially missing window head flashings, do not leak on the day and are invisible from the ground afterwards
- Waterproofing is the most expensive non-structural defect to fix after handover, and the only chance to check it is before tiling
- Mandatory certifier inspections differ by state and are compliance checks, not quality inspections
- Tolerances decide disputes: know the number, photograph the measurement, and drop items that are within tolerance
- Re-inspect after rectification, because "it has been fixed" and "it has been fixed correctly" are different claims
- Statutory time limits differ sharply between NSW, Victoria and Queensland, and a dated stage report is what proves when a defect existed
References and Resources
- NCC 2022 Volume Two, ABCB
- Building Regulations 2018 (Vic), mandatory notification stages
- Building Act 1993 (Vic), section 134 limitation on building actions
- Building disputes, defects and delays, Consumer Affairs Victoria
- Warranties and guarantees on building, Consumer Affairs Victoria
- Approvals needed for your building project, NSW Government
- Stages of a building inspection, Business Queensland
- QBCC, time limits for cover and claims
- Appoint a principal certifier, Service NSW
- Research on serious building defects in NSW strata communities
- Building defect complaints, Building Commission NSW
Related Articles
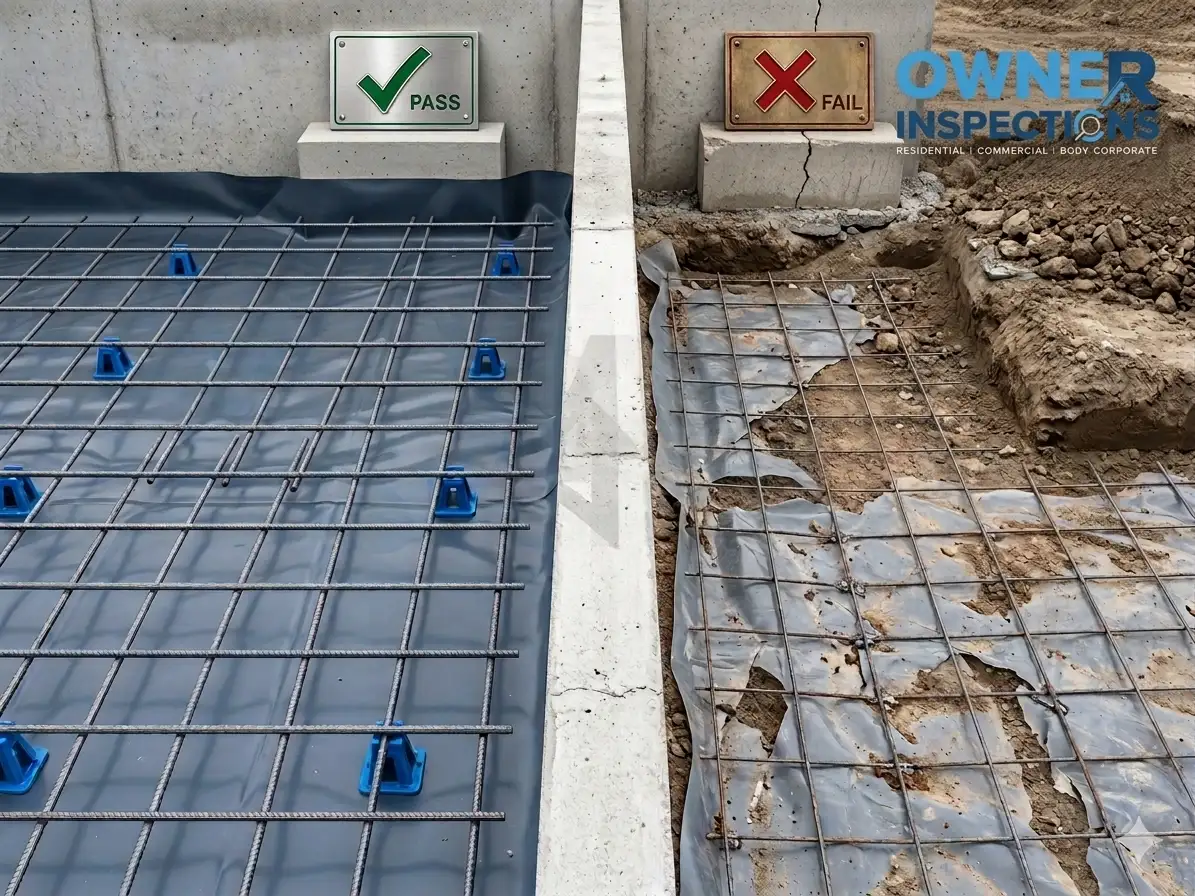
Why Steel Reinforcement Matters in Pre-Slab Inspections
What to check in the reinforcement, bar chairs and vapour barrier on the one day it is all still visible.

Understanding Frame Stage Inspections: What They Cover and Why They Matter
A closer look at the tie-downs, bracing and timber grades that get sealed inside your walls.

Understanding Lock Up Pre Plaster Stage Inspection
The last chance to see flashings, sarking and framing before the plasterboard goes on.
Need Construction Stage Inspections?
Protect your investment with independent inspections at every critical build stage, from pre-pour to handover.