Building defects are stressful enough on their own. The bigger problem starts when a homeowner knows something is wrong but cannot prove when it appeared, how bad it is, or what the builder was told. If a dispute reaches a regulator, tribunal or court, the outcome will depend on the quality of your evidence. NCAT says cases are decided on the evidence presented, VCAT treats expert reports as evidence, and QCAT accepts documents such as contracts, receipts, correspondence, photos, videos and expert reports.
If you have cracking, leaks, movement, poor finishes, waterproofing failures or incomplete work, start documenting straight away. Good documentation helps you show what the defect is, when it appeared, whether it is getting worse, what you spent to limit damage, and whether the builder had a fair chance to fix it. That makes your position much stronger in NSW, Victoria and Queensland.
Why Documentation Matters in Defect Claims
Tribunals such as NCAT in New South Wales and VCAT in Victoria make decisions based on the evidence presented by each party. If you claim that your builder left waterproofing defects in your bathroom, the tribunal will want to see photographs, inspection reports, and a record of when the problem first appeared and what was communicated to the builder.
Builders and developers have legal teams. They will challenge your claim at every opportunity. They may argue that the defect does not exist, that you caused it, that it falls outside the warranty period, or that they were never properly notified. Strong documentation removes these arguments one by one.
The goal is simple: create a clear, dated, verifiable record that tells the story of the defect from the moment you first noticed it through every communication and inspection to the present day.
Start documenting as soon as you notice a problem. Even if you are not thinking about legal action yet, early records become invaluable if the situation escalates later.
Photography and Video Tips
Photographs and videos are the most immediate and persuasive form of evidence in a defect claim. A tribunal member who can see a crack, a water stain, or a poorly installed fitting will understand the issue far more quickly than one reading a written description alone.
What to Photograph
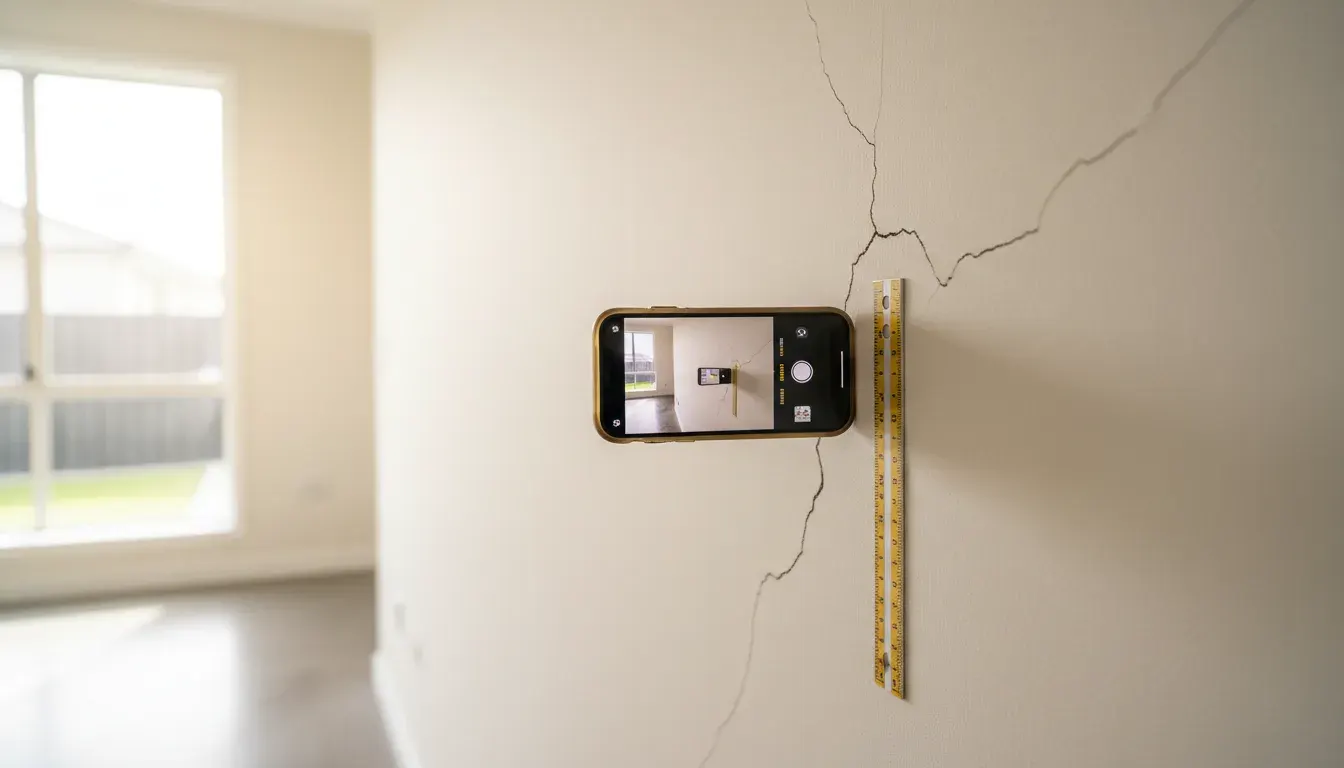
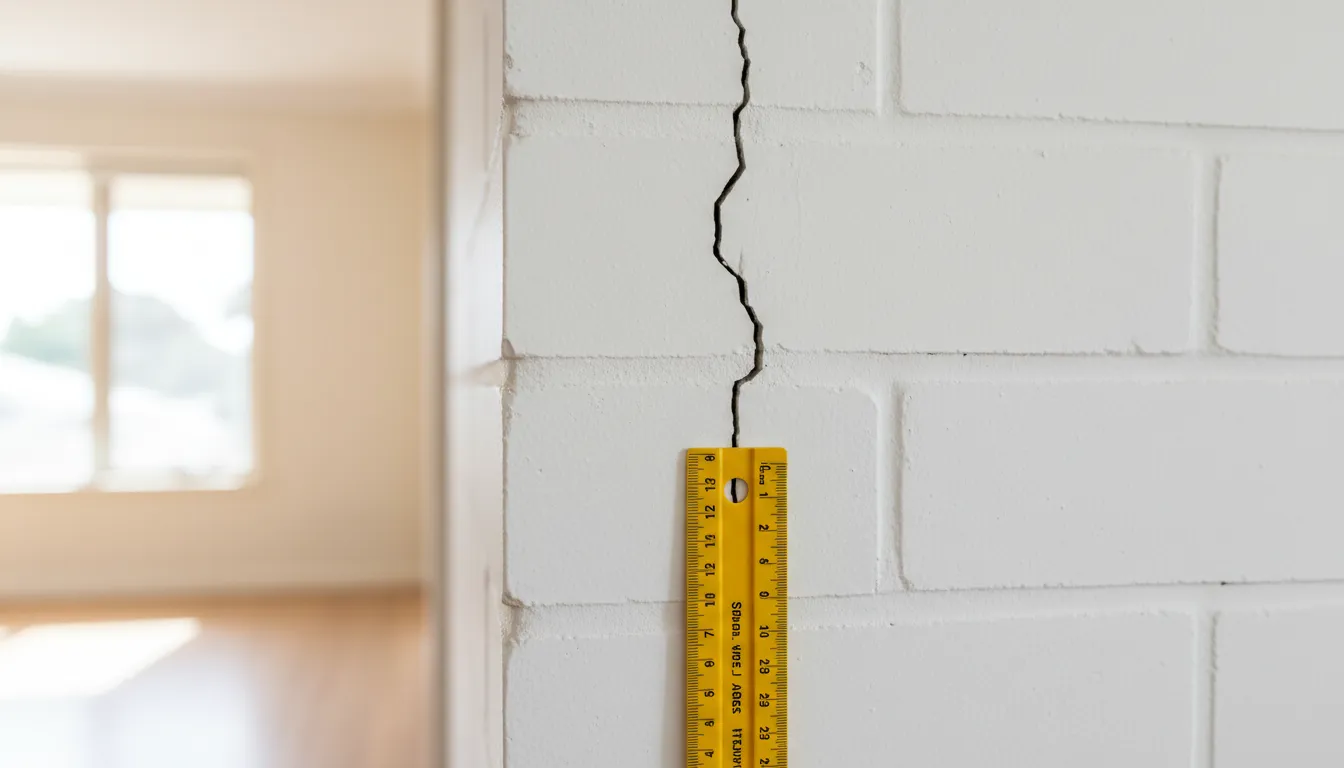
Every defect should be photographed from at least two perspectives: a wide shot that shows the defect in context within the room or area, and a close-up that shows the detail of the problem.
- Take a wide-angle shot showing the full wall, ceiling, floor, or area where the defect is located
- Take a close-up of the defect itself with a ruler, tape measure, or coin placed next to it for scale
- Photograph from multiple angles to show the extent and shape of the problem
- If the defect changes over time (such as a crack that is growing), photograph the same spot at regular intervals from the same position
- Ensure lighting is good and the images are sharp and in focus
- Include surrounding features such as doors, windows, or fixtures that help identify the exact location
Video Walkthroughs
Video is especially useful for documenting water leaks, areas of extensive damage, and defects that are difficult to capture in a single photograph. Walk through the affected area slowly, narrating as you go. State the date, the room you are in, and describe what you are seeing.
Tip
Use your smartphone's built-in camera rather than apps that compress images. Keep the original files with their embedded metadata, which includes the date, time, and GPS coordinates of each photo. This metadata can serve as evidence of when and where the photo was taken.
Organising Your Photos
Create a folder structure on your computer or cloud storage that is organised by date and location. For example:
- 2026-01-15 / Bathroom / Waterproofing leak containing all photos taken on that date of the bathroom leak
- 2026-02-10 / Balcony / Cracking tiles containing all photos of the balcony tile damage from the February inspection
- 2026-02-26 / Kitchen / Cabinet defects containing close-ups and wide shots of poorly fitted cabinetry
This organisation makes it straightforward to retrieve specific evidence when preparing your claim or briefing an inspector.
Keeping Written Records
Written records provide the narrative that connects your photographs and reports into a coherent story. Every time you notice a new defect, observe an existing one getting worse, or have any interaction with the builder about the issue, write it down.
What to Record
- The date and time you first noticed each defect
- A description of the defect in plain language, including its location, size, and appearance
- Any changes you observe over time, such as a crack widening or a water stain spreading
- Weather conditions on the day you noticed the issue (relevant for water ingress and drainage problems)
- The names of anyone who inspected the defect, including tradespeople sent by the builder
- What was said during phone calls or in-person conversations with the builder, including the date, time, and who you spoke with
- Any temporary repairs you carried out to prevent further damage, along with receipts for materials
Format
A simple dated log is the most effective format. You can use a spreadsheet, a notebook, or a document on your computer. The key is consistency. Record every observation and interaction as close to the time it happens as possible. Notes written weeks or months after the fact carry less weight.
Never rely solely on verbal conversations. If you speak with your builder on the phone, follow up with an email summarising what was discussed. This creates a written record that the builder cannot deny later.
Obtaining Independent Reports
Your own photographs and notes are important, but an independent building inspection report from a qualified professional adds significant weight to your claim. Builders can dispute your interpretation of a problem, but it is much harder to dismiss the findings of a licensed building consultant who has referenced the National Construction Code and relevant Australian Standards.

When to Get an Independent Report
- As soon as you identify serious defects. Early reporting establishes the condition of the property at a specific point in time. If the builder argues that you caused the damage later, a dated report from when the defect first appeared undermines that argument.
- Before the warranty period expires. In NSW, major defects must be claimed within six years of completion. In Victoria, structural defects are covered for ten years. An independent report obtained within the warranty period is strong evidence that the defect existed while the builder was still liable.
- Before any rectification work begins. Once a defect is repaired, the original evidence is gone. An inspection report and photographs taken before repairs preserve the evidence permanently.
What the Report Should Include
A useful defect investigation report for legal purposes will identify each defect, explain its likely cause, reference the specific clauses of the NCC or Australian Standards that have been breached, and provide an estimated cost of rectification. This structure mirrors what tribunals such as NCAT and VCAT expect to see in evidence.
Important
Choose a building consultant who has experience with defect investigations and, ideally, with providing evidence in tribunal proceedings. A pre-purchase inspector may not have the expertise to prepare a report that meets the evidentiary standard required for a legal claim.
Preserving All Correspondence
Every communication with the builder, developer, strata manager, or any other party involved in the defect is potential evidence. This includes emails, text messages, letters, and even social media messages.
How to Preserve Correspondence
- Save all emails in a dedicated folder. Do not delete any messages, even those that seem unimportant at the time
- Screenshot text messages and save them with the date and the contact name visible
- If you send a formal letter, send it by registered post so you have proof of delivery
- Keep copies of any documents the builder sends you, including rectification proposals, quotes, and schedules
- If the builder sends tradespeople to inspect or repair defects, get their names and details and record what they say about the issue
Formal Written Notices
When you notify the builder of defects, do so in writing. A formal defect notice should list every defect with a description and reference to your photos, state that you expect rectification within a reasonable timeframe (typically 14 to 28 days), and reference the applicable statutory warranty provisions. Keep a copy of the notice and proof that it was delivered.
This formal notice is often a prerequisite before you can take the matter to a tribunal. In NSW, for example, NCAT will want to see that you gave the builder a reasonable opportunity to fix the defects before lodging an application.
Unsure if the defect falls under warranty?
Learn how construction warranty defect reports help document faults, clarify builder obligations, and support a stronger claim.
Defect Guide
Building a Timeline of Events
A timeline is one of the most useful documents you can prepare for a legal claim. It brings together all of your evidence into a single chronological narrative that shows when defects appeared, what was communicated, and how the builder responded (or failed to respond).
What to Include in Your Timeline
Construction and handover dates
Record the date of the building contract, practical completion, the occupation certificate, and the date you moved in or settled on the property.
First observation of each defect
Note the exact date (or approximate date if you cannot be precise) when you first noticed each problem. Link this entry to the corresponding photographs and written notes.
Communications with the builder
List every email, letter, phone call, and meeting, with a brief summary of what was discussed and any commitments the builder made.
Inspections and reports
Record the dates of any inspections (by the builder, their tradespeople, or your independent inspector) and note the key findings.
Rectification attempts
If the builder attempted any repairs, record the dates, what work was done, and whether the repair was successful. Photograph the area before and after the repair attempt.
Escalation steps
Note when you lodged complaints with regulators such as NSW Fair Trading or the Victorian Building Authority, applied to a tribunal, or engaged a solicitor.
Present the timeline as a simple table or list with the date in the first column and the event in the second. This format is easy for a tribunal member or solicitor to follow.
How Long is a Builder Liable for Defects?
This is one of the most searched questions, and the answer depends on the state and on whether you are talking about a contract defect period, statutory rights, or insurance.
New South Wales
In NSW, there are usually two different periods to think about. The builder’s own defects and liability period is usually around 13 weeks for new homes, but statutory warranties run longer. NSW says statutory warranties are 6 years for major defects and 2 years for all other defects for contracts signed on or after 1 February 2012. If the loss becomes apparent in the last six months of the warranty period, the owner gets an extra 6 months to enforce the warranty.
Victoria
In Victoria, some contracts include a defect liability clause giving the builder 3, 6 or 9 months to fix defects. That is not the end of the owner’s rights. Consumer Affairs Victoria says implied warranties apply to domestic building work for 10 years. That is the main legal point the article needs to make clearly.
Queensland
In Queensland, the defects liability period for a new build or major renovation should usually be 6 or 12 months under the contract, and QBCC says it is commonly 12 months from practical completion. For non-structural defect disputes, QBCC says owners should first notify the contractor and, if unresolved, lodge a complaint as soon as possible and no later than 12 months from completion.
Does Insurance Cover Building Defects?
Sometimes, but only in limited situations. Homeowners should not assume that any defect will be paid by insurance.
NSW
NSW home building compensation is there to protect owners if the builder cannot complete work or fix defects because of insolvency, licence suspension for failing to comply with a court or tribunal order, death or disappearance. SIRA says the cover protects homeowners for 6 years against major construction defects and 2 years for other losses from completion.
Victoria
In Victoria, domestic building insurance covers the owner if the builder dies, is insolvent or disappears. For policies issued by VMIA on or after 1 July 2015, cover may also respond if the builder fails to comply with a final VCAT or court order. The cover is generally up to $300,000 for structural defects for 6 years and non-structural defects for 2 years. In all other cases, the builder is still the party expected to fix or complete the work.
Queensland
QBCC says home warranty insurance is meant to protect homeowners for defective or incomplete building work and subsidence. For structural defects, cover generally applies if you first become aware of the defect within 6 years 6 months of the cover start date and lodge within 3 months of becoming aware. For non-structural defects, the defect must usually appear within 6 months of substantial completion and the claim must be made within 7 months.
Practical Takeaway
Insurance may help, but it is not a substitute for fast documentation and written notice.
What is the Defect Liability Clause?
A defect liability clause is a contract clause that gives the builder a set time after completion to return and fix certain defects. In Victoria, Consumer Affairs Victoria defines it as a clause that gives the builder 3, 6 or 9 months to fix defects arising from the contracted works, and says it should not be used to deal with defects already known at completion. Those should be fixed before final payment is made.
Queensland uses the same idea, though the period is commonly 12 months from practical completion. NSW also refers to a builder’s own defects and liability period, usually about 13 weeks for new homes.
The key point is that a defect liability period is not the same thing as your full legal rights. It is one contract mechanism for early rectification. Statutory warranties and insurance rights can run longer.
When to Escalate the Dispute
If the builder does not fix the issue after written notice, the next step depends on the state.
In NSW, home building disputes generally need to be referred to NSW Fair Trading before NCAT can accept the application, unless an exemption applies.
In Queensland, parties generally need to go through the QBCC dispute resolution process before making a building dispute application to QCAT, and QCAT can then require evidence and expert reports.
In Victoria, expert evidence can be important in VCAT building matters, and expert reports must be impartial.
Need independent evidence for a legal or tribunal claim?
An expert witness report can help you present defects, incomplete work, and non-compliant construction in a clear, court-ready format.
Witness Reports
Common Documentation Mistakes to Avoid
- Relying on verbal agreements or phone conversations without following up in writing
- Deleting text messages or emails, even if they seem routine
- Waiting weeks or months to photograph defects after first noticing them
- Allowing the builder to carry out repairs without first documenting the original defect with photos and an independent report
- Using photos without scale references, making it impossible to determine the size of cracks or damage
- Failing to back up digital files, leaving you vulnerable to data loss
- Not recording the dates of phone conversations or site visits
Key Takeaways
- Documentation is the single most important factor in a successful building defect claim.
- Photograph every defect from multiple angles with a scale reference, and keep the original files with metadata intact.
- Maintain a dated written log of every observation, conversation, and interaction related to the defects.
- Obtain an independent defect investigation report from a qualified building consultant as early as possible.
- Preserve all correspondence, including emails, text messages, and letters, in an organised and backed-up filing system.
- Build a chronological timeline that connects your evidence into a clear narrative for the tribunal or court.
- Follow up all verbal conversations in writing to create a record the builder cannot later deny.
For a complete overview, see our guide to building defect investigations.
Concerned About Building Defects?
Our licensed inspectors cover Sydney, Melbourne, and all major Australian cities.